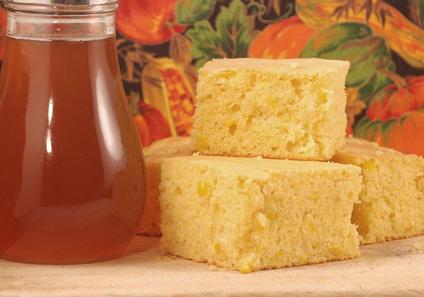
Cornbread takes no time at all to make: the recipe is HERE.
 The Saint Bede community likes cornbread for breakfast, and in the fall and winter I bake a lot of it. My preference is for sweet cornbread, with sweet milk and a little extra sugar, but Abbot Philip has always loved cornbread with whole corn mixed it. I'm not a fan, but when we have corn leftover at supper as we did tonight, I'll mix up a batch. The new crop of honey has been brought in, too. Warm cornbread, butter and honey . . . .mmmmm. . . . (insert Homer Simpson eating sound effects here). Cornbread takes no time at all to make: the recipe is HERE.
2 Comments
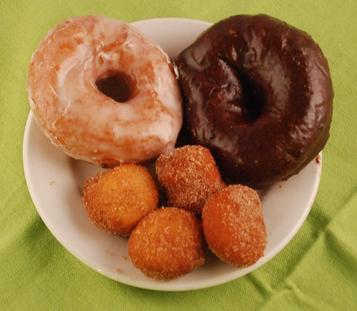 I have a great recipe for batter donuts, but I'm still playing around with a yeasted donut recipe. The best homemade donuts I've ever made came from brioche dough, but I'm much too lazy to go through all that extra work with the butter just to get a breakfast quick bread. This picture represents a further attempt, adapting a recipe for "Spudnuts", a dough recipe using mashed potatoes to help develop a soft texture and tender crumb. I'm still not satisfied---I think the starch in the potatoes may be making the crust a little chewy. I can report, however, that when a group of seniors over in the school gym heard about this operation, a dozen or so donuts disappeared rapidly! More updates as the experimentation continues. 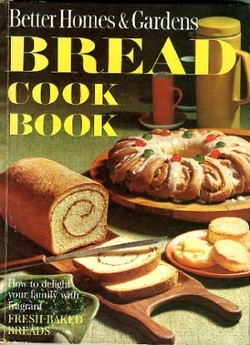 This is the 1963 edition of the Better Homes and Gardens Bread Cook Book and if you ever see it at a flea market or rummage sale, BUY IT! It's one of my favorite old-time recipe books, and it has clear instructions and photos for shaping a number of old-fashioned breads and coffee cakes that you don't see much anymore. Among them is an Apricot Daisy Coffee Cake that isn't terribly complex to make, but looks outstanding on the breakfast table. You can use any basic sweet dough, including my Best Ever Crescent Roll Dough (click HERE for the recipe). For the one I made recently, I used a dinner roll dough recipe but substituted half and half for the liquid (mainly because we had a couple of quarts that were going to expire in four days, so I wanted to use it up!) 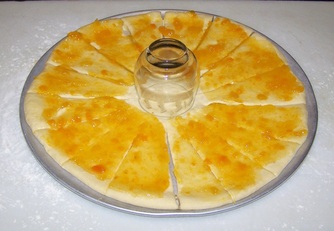 You roll the dough out into a 14" circle and place it on a metal pizza pan lightly coated with cooking spray. Place a glass in the center, and spread with apricot pastry filling or preserves (you can use any filling, really). Then take a pizza cutter and divide the dough into 16 even "spokes"---the glass keeps you from cutting all the way through, so that an open section is left in the middle. 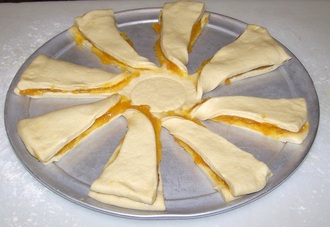 Remove the glass, then fold one spoke on top of the one next to it, until you have 8 double decker spokes. Make sure you fold them all in the same direction. Try not to let too much filling drip onto the pan. 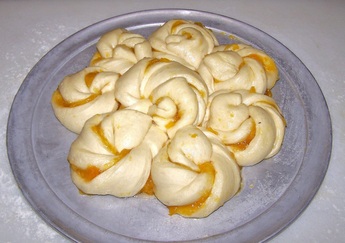 Twist each double decker spoke three or four times, and then curl it into spiral or snail shape. The first one goes in the open center space where the glass had been---do this first so you have a little more room to work with the others. The remaining seven are arranged evenly around the center. Cover and let rise for 30 minutes. 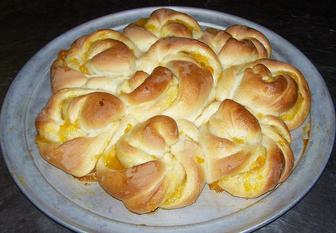 Here it is, fresh out of the oven. I baked it for 30 minutes at 350 degrees. Because the dough I used had a lot of sugar and eggs, about 15 minutes into the baking process I covered it loosely with aluminum foil so the top wouldn't brown too much. You should let it cool slightly before trying to transfer it to a wire rack to cool completely. Or just let it cool to lukewarm on the pan, put on the frosting and serve it on the same pan. 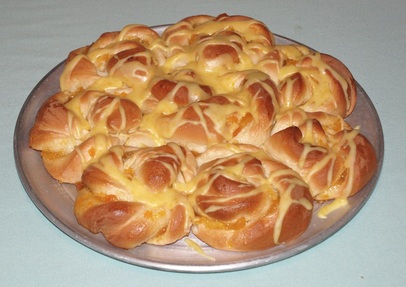 You can use plain glaze or frosting, but I like to add another layer of flavor by using the zest and juice of a medium orange with a dash of almond extract, whisked into about 1 1/2 cups of powdered sugar. I mixed it in a Pyrex measuring cup so I could microwave it for 30 seconds. Heating the glaze until it just boils helps to cut the "raw sugar" taste. If you want a brush-on glaze, use it immediately; otherwise, let it cool about 5 minutes before pouring it in swirls over the coffee cake. I've made this with other fillings and toppings: cinnamon sugar with hazelnut caramel glaze; almond pastry filling with a light glaze and toasted sliced almonds; mixed berry filling with a cream cheese frosting. Don't be afraid to experiment with the filling, the frosting, and the dough---which is a good enough rule for any recipe! 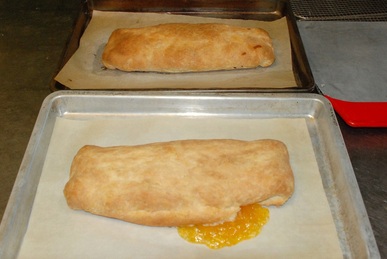 A little too much filling in the one up front---read the end of the recipe for advice. When my sister Angela was little, she was unable to pronounce our family name “Garramone,” so my father’s mother became "Grandma Gome" (pronounced GO-me). Grandma was an excellent baker, and this Danish Kringle was one of her favorite recipes. It’s quite different from the kringle made with yeasted pastry dough. It’s both simpler and more difficult: only a few ingredients, but a lot of technique. Rolling out and shaping such a rich dough can be a bit intimidating, but it’s well worth the effort. I hadn't made this recipe in years, so I pulled it out this week and made a couple of breakfast pastries. I always keep a variety of Solo cake and pastry fillings in the pantry, so I decided on apricot and cherry. The dough was easier to roll out than I remembered, but I have had more experience with pastry dough since the last time I made this recipe, which seems to have paid off. I enjoyed thinking of my grandma rolling out this dough to make a sweet treat for her three sons. That is one of the distinct pleasures of baking from family recipes: the sense of heritage, of being connected to someone you love over time and space, that even death hasn't separated you entirely from your kitchen mentors. Grandma Gome was also famous for her cinnamon rolls, but the recipe she handed down (and I have the one written by her own hand) has vague expressions like "enough" flour or "bake until done" so I'm going to have to do a little retro-engineering. I'll be sure to report on that soon, but for now, make a couple of pastries, on for your family and one to share. Grandma Gome’s Shortcut Kringle 2 cups flour 2 sticks butter 1 cup sour cream 1 15-oz. can apple pie filling (or any flavor you like). In a medium size bowl, cut butter into flour using a pastry blender or two knives. Butter should be in pieces about the size of peas (slightly larger pieces than for a pie crust). Mix in sour cream until well blended, and knead once or twice, just long enough to collect stray pieces into a ball. Wrap dough in plastic or waxed paper, and chill for at least two hours. Divide dough into two pieces. On a well-floured board or pastry cloth, roll a piece into a 12” x 14” rectangle. Spread half of the apple pie filling down the center third of the dough, leaving a 2” border at top and bottom. Fold over sides to center and pinch to seal. Fold top and bottom borders in and pinch to seal. Carefully lift kringle and place it, seam side down, onto an ungreased 9” x 13” jelly roll pan. Repeat with second portion of dough, using a second pan. Bake in a preheated 400° F. oven for 10 minutes, then reduce heat to 350° and bake for another 35 minutes or until brown. Remove from oven and let the pastry settle for about 10 minutes before transferring to a wire rack to cool slightly. Best when served warm, drizzled lightly with powdered sugar icing, but these also will keep for a day or two and bear re-heating. NOTE: I used the 12 oz. cans of Solo Cake and Pastry Filling, but I really needed only 8 0z. worth. I didn't know what to do with just 4 oz. of filling, so I used it all. In hindsight, I should have just spread it on toast the next morning! The apricot pastry in the foreground of the photo split during baking and spilled some of its filling. For the raspberry pastry in the back, I rolled the dough as directed, spread half the can of filling just slightly to the left of the center of the dough, flipped the left hand section of dough on top of that filling, spread the rest on top and flipped the right side of the dough. This "double decker" pastry worked out much better and tasted wonderful. 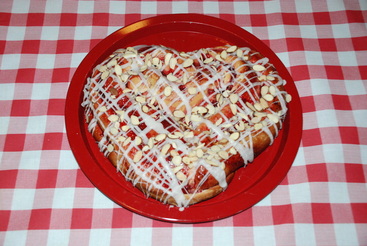 Here's a lovely breakfast treat to make for your sweetheart for Valentine's Day breakfast. It's a heart-shaped yeasted coffee cake that is not much more difficult than cinnamon rolls, so it's well within the reach of most intermediate Breadheads. The dough used for this coffee cake could be any basic sweet dough, something you might use for cinnamon rolls or soft dinner rolls. Sweetheart Coffee Cake Yield: 1 loaf, about 12 servings ½ batch (20 to 24 oz.) of Basic Sweet Dough or dinner roll dough 1 (12 oz.) can Solo Cherry Cake and Pastry Filling On a lightly floured board, roll dough out into a rectangle 12” x 14”. Top the dough with the filling, leaving 1 inch of the top edge dry. Roll the dough up jellyroll style. Lightly brush the top edge with a little water, so it will stick to the roll; pinch to seal. Using a sharp knife cut the roll lengthwise, leaving about 2 inches uncut at both ends. Grasp the two sections near the top and rotate them so the interior layers are facing upwards, and pull the top section toward you to form the heart shape (see photos). Place on a baking sheet or jellyroll pan lined with parchment. Cover with a dry towel and let rise until doubled, 30 to 45 minutes. Bake in a preheated 375 degree oven for 20 to 25 minutes or until lightly browned. Remove from baking sheet and cool on rack. Drizzle with almond flavored glaze and sprinkle with toasted sliced almonds. 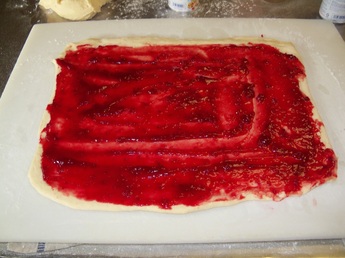 Here's the dough spread with cherry filling. You could use any flavor you want, but cherry and raspberry look the most appropriate for a Valentine. 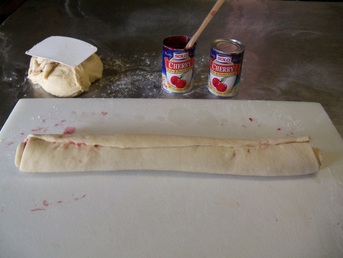 Here's the jellyroll---the next step (not illustrated) is to put it on a parchment-lined jellyroll pan or baking sheet. You CAN shape it on the counter and then transfer it, but that can be a little tricky and messy. 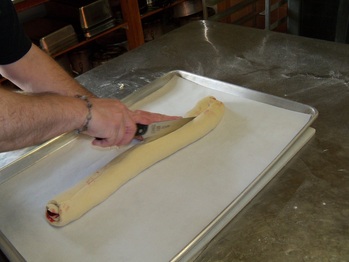 I used my sharpest knife to cut it down the middle, leaving about 2" uncut at top and bottom . . . 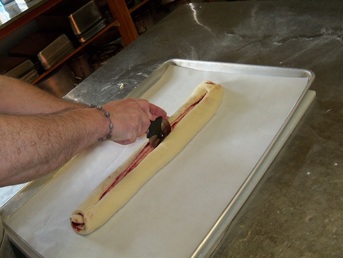 . . . and then used a pizza cutter to make sure it was cut all the way through. The pizza cutter doesn't cut the parchment or scratch the pan. 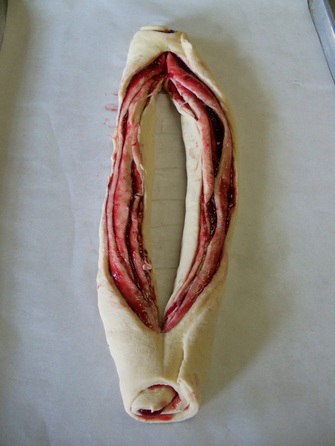 The cut sides are turned upwards. At this point it looks like a bloody squid on a butcher block, but push on through! 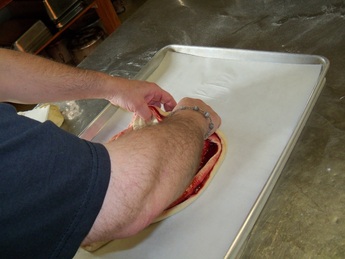 Grab the two sides near the top and bring them downward to form the heart (bad angle of photo, I know---sorry!) 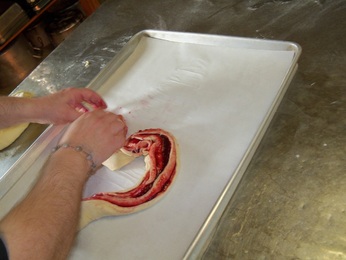 Notice that I actually turned the top edge under to point downwards. That makes the upper arches more pronounced so you get a classic heart shape. 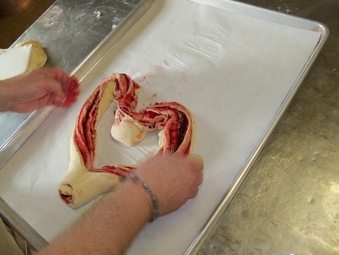 The sides of the heart may require a little adjustment in order to get a symmetrical coffee cake, and you'll get filling all over your fingers. 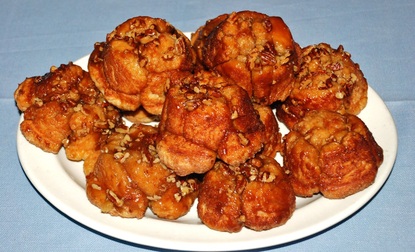 If your family likes monkey bread for breakfast, you have to try these. They are made just like money bread, except you divide the dough among Texas-sized muffin tins. There's about a tablespoon of caramel sauce in the bottom of the cup, then another tablespoon of chopped pecans. Six to eight pieces of dough dredged in cinnamon sugar will fill the cup about halfway, then another two tablespoons of caramel sauce goes on top. If you're using biscuit dough, they go straight into the oven at 375 degrees. if you use cinnamon roll dough, as I did, let them rise for 30 minutes before going into the oven. 15 minutes later, pull the tins out, turn them upside down on top of a piece of parchment, and use a narrow metal spatula or spreader to scoop any spilled caramel and nuts and put them back on top of the muffins. Serve warm, and don't count on leftovers! 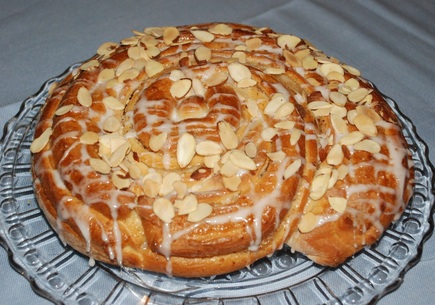 As you may have read in my previous post, one of my goals this year is to expand my repertoire of yeasted coffee cakes. Fortunately, between my cookbook collection and Pinterest, I shouldn't have any trouble coming up with new forms for shaping basic sweet dough into beautiful breakfast treats. This gorgeous swirl was inspired by a recipe I found on Pinterest this week. I'm going to give you the link to the blog HERE for two reasons: first of all, give credit where credit is due (the original had an orange/fig filling, and came from Cooking Light); secondly, her blog has lovely photos of the shaping process, much prettier than mine. There seems to be a photographic advantage to baking during the day in a modern suburban kitchen instead of at night in a commercial kitchen with a stainless steel work table! However, my finished product, as you can see, looks just fine on the abbey breakfast table. I used Solo Almond Filling, which has a wonderfully intense flavor and the consistency of some kind of adhesive. I know that sounds like a disadvantage, but in fact I consider it an asset. It's harder to spread it evenly on a soft dough, but it glues the layers of the dough together and makes them very easy to handle during the shaping process. The dough was the same I use for Best Ever Crescent Rolls (the recipe is HERE) but you could also use Basic Sweet Dough or any dough for dinner rolls. I used half the batch; the other half was used for a lattice braid with cherry filling---but that's a recipe for another day! 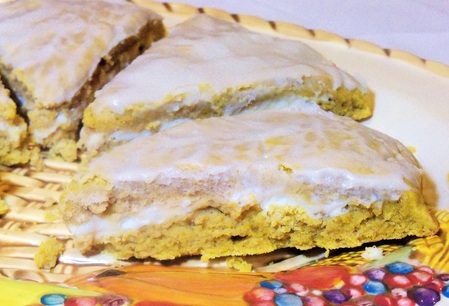 Gluten-free pumpkin scones with a sweet cream cheese filling! Not dairy free or vegan, but it's a start. On my way to a decent gluten free pizza crust! Gluten-Free Pumpkin Scones with Cream Cheese Filling
2 ½ cups all-purpose gluten-free baking mix (I used King Arthur’s). 1/3 cup light brown sugar 1 teaspoon ground cinnamon ½ tsp. pumpkin pie spice. ¼ tsp. nutmeg 1 ½ teaspoons baking powder 1/4 teaspoon salt 1 stick cold butter, cut into pieces 1 egg 1/2 cup milk 1/2 cup canned pureed pumpkin (NOT pie filling) 1 teaspoon pure vanilla extract 8 oz. cream cheese, softened ¾ cup powdered sugar, divided 2 Tbs. milk Preheat oven to 400 degrees F. Line a baking sheet with parchment paper and have one additional sheet of parchment available. Mix the softened cream cheese with ½ cup of powdered sugar and beat until smooth. In a large bowl, sift together the flour, sugar, spices, baking powder, and salt. Cut the butter into small pieces and blend into the flour mixture with a pastry blender or two knives. The mixture should look like coarse crumbs. In a separate bowl, mix together the milk, egg, pumpkin puree and vanilla. Add the milk mixture to the flour mixture and mix just until the dough comes together. Knead dough gently four or five times while it is still in the bowl. Remove half of the dough from the bowl and pat the dough into an 8-inch circle in the center of the baking sheet (it helps to butter your hands so the dough will not stick to you). Spread three quarters of the sweetened cream cheese evenly over the circle of dough. Spray the second piece of parchment lightly with cooking spray, and pat the second portion of dough into an 8-inch circle. Carefully flip the second circle of dough on top of the first and peel off the parchment paper. Using a large rotary pizza cutter, cut dough into 8 wedges. Bake at 400 degrees for 20 minutes, or until round is firm on the edges but still slightly soft in the middle. Cool on a wire rack. Beat the remaining cream cheese with ¼ cup of powdered sugar and the 2 tbs. of milk to make a glaze ( a couple drops of vanilla extract and a pinch of salt doesn't hurt, either!). Spread glaze on the scones and cut apart before serving. Makes 8 large scones. About a case of whole milk expired on the 3rd, which means the lunch room can't sell it, but as many a mom on a budget will tell you, it's still OK to drink for a few days after the date. So I decided to make a big batch of Victorian Milk Bread. I know that sounds like a really fancy title that would have some archaic recipe to go with it. But in reality, if you take any basic white dough recipe, use milk instead of water and melted butter instead of oil, you've pretty well got it. Eric Treuille and Ursula Ferrigno in their excellent book Ultimate Bread show the bread made in a pan, but the dough is shaped into an S before it goes in the pan. See a picture of someone else's S-shaped bread here. Not sure what the big deal is---it doesn't seem to enhance the appearance that much. 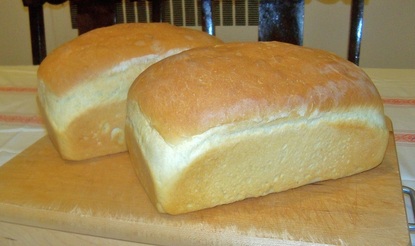 Here's my version: just a classic large loaf. These were baked in 9 x 5 inch pans, using 2 pounds of dough. 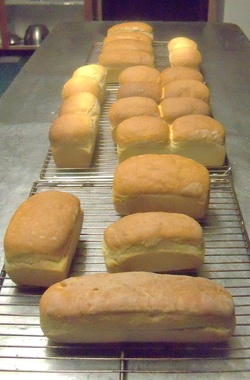 Here's the whole batch (almost--two loaves are already on the abbey breakfast table!) The milk in the recipe makes for a more tender crumb and softer crust, and also aids in achieving the golden brown appearance. I used honey instead of sugar for the sweetener, about one and a half tablespoons per loaf. The long loaf in front was baked in a stoneware pan. The double loaves on the right were baked in the ganged pans pictured below. 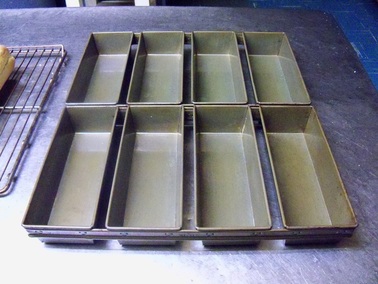 These are heavy duty commercial pans ganged four across. A whole loaf is a bit unwieldy, so that's why I bake two in each section, 20 ounces each. If you bake larger batches these pans are really handy, but before you go shopping, measure the width of your oven first to make sure they'll fit! 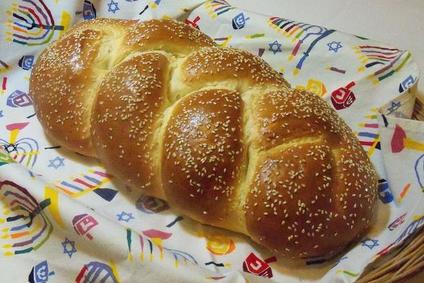 In Junior religion we're studying the Jewish roots of Christianity, and since we were discussing food traqditions I decided to bake some challah as a treat for my classes. I haven't made it in ages and I confess I have forgotten the Hebrew prayer that one recites while taking off a small piece of the dough known as "Elijah's portion." Nonetheless, here's the recipe I used, from Season 1 of "Breaking Bread", although I made sinple three strand braids instead of the more complex braids mentioned in the directions. CHALLAH
2 envelopes yeast 1/2 cup sugar 1 cup lukewarm water 3 eggs 1 Tbs. sugar 3/4 cup vegetable oil 1 Tbs. salt 1 - 1/2 cups lukewarm water 1 tsp. cinnamon 6 to 7 ½ cups of bread flour 1 Tbs. vanilla 1 beaten egg (to brush the top) In a small bowl, proof the yeast with the cup of lukewarm water and tablespoon of sugar. Add 2 cups of the flour and let stand for about 30 minutes to allow the yeast to develop. In a large bowl, combine water, oil and eggs and mix well. Stir in the salt, cinnamon, vanilla, and sugar. Add the yeast sponge and mix well. Add the remaining flour, about a cup at a time, until you get slightly firm dough--it will be a bit softer than ordinary bread dough because of the eggs. Knead for about five minutes, and then let rise, covered, until doubled in bulk, about an hour and a half. Punch down the dough and turn it out onto a lightly floured surface. Knead briefly to work out the larger air pockets. Divide the dough into seven equal pieces and roll each piece into a rope, about 12" long. Braid four of these ropes together, tucking the ends underneath. Place on a lightly greased baking sheet. Braid the remaining three ropes and gently place them on top of the four-rope braid. Cover with a towel and let rise until nearly doubled in bulk--the loaf will be quite large. Brush all over with the beaten egg and sprinkle with sesame or poppy seed if desired. Bake in preheated oven at 375° until golden brown, about 45 minutes. If your oven doesn't bake evenly, be sure to turn the pan around every 15 minutes or so. Cool on a rack. Notes ---I’ve seen many different recipes for challah (there are 57 of them on www.food.com), but I like Marian Honig’s version, (found in her excellent book Breads of the World), which I have adapted here. Her addition of small amounts of vanilla and cinnamon make this bread smell heavenly as it’s baking. This recipe takes a lot of time and effort, but it's really worth it. --The large braided loaf is the traditional form, but you can make two smaller single braids, or form wreaths. |
AuthorFr. Dominic Garramone AKA Categories
All
Archives
June 2024
|